
Morgajel’s “It’s Not That Hot” Sauce

Pale Green hotsauce
Ingredients
- 2 tbsp canola oil
- 8 jalapenos
- 5 serrano
- 1 poblano
- 1/3 small red onion
- 1/2 cup white vinegar
- 1 cup water
- 1/2 tbsp garlic powder
- 1/2 tbsp black pepper
- 1/4 tbsp cumin
- 1 tbsp lime juice
Directions:
- Quarter peppers and slice onion. I used the seeds and ribs of the peppers for optimal heat.
- Sautee in a small sauce pan with oil on medium heat. Keep a lid on it but stir often.
- When a majority of the peppers start to soften and the skins peel, add water and vinegar. Let boil for 20-30 minutes, stirring often.
- Let it cool a bit, then throw it in a blender. Puree the crap out of it, then add the garlic powder, black pepper, cumin and lime juice, then puree the crap out of it again.
- Once it cools a bit more, pour it through a strainer into a funnel into your receptacle. You’ll need to smush it around with a spoon and will end up with 1/4 cup of fibrous paste.
- Cap it and let it cool, then put it in the fridge for a few days.
Total prep and cooking time was about an hour.
 December 13, 2013
·
December 13, 2013
·  morgajel ·
  152 Comments
 Posted in: Uncategorized
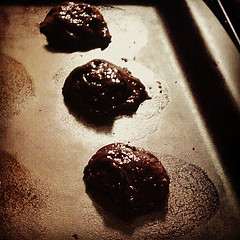
Frosted Cake Mix Cookies
Pinterest is evil. There’s no question about it. I recently came across a recipe for Cake Batter Rice Crispy Treats over at Gimme Some Oven and I so had to try them. I mean seriously – cake batter and rice crispy treats – who could pass that up. I did try them and I have my thoughts. I made my own adjustments, but overall they were good.
So what does Cake Batter Rice Crispy Treats recipe have to do with Frosted Cake Mix Cookies? Easy…you use 1/2 cup of the cake mix for the crispy treats; now what do you do with the rest of the cake batter? Obviously you make cookies. *grin* Thankfully Ali at Gimme Some Oven left that tip in her comments and honestly, these turned out better than the rice crispy treats. They’re like miniature cakes! Before I go into what I did, I want to share Ali’s method. These are the measurements she had:
…just measure out 6 oz. of the remaining cake mix, and combine it with 1/4 cup vegetable or canola oil, and 1 egg. Stir until mixed. Then form into cookie dough balls, and bake in a 350 degree oven for 10-12 minutes.
 I had a problem with those measurements and I ended up doing a lot of adjusting while I was making them. I may have done something wrong or what, so in case I did, that’s why I included hers above. When I was making my rice crispy treats, I was planning on using two different cake mixes – devil’s food and yellow – so I ended up with a lot of cake batter over. It ended up being a good thing. This is where I think I screwed up the measurements – from one box I ended up with about 24oz of cake mix left (per the markings on my batter bowl), so I adjusted the measurements to fit. My math must have been wrong because 1 cup of vegetable oil and 4 eggs made one very wet cookie batter. I honestly thought I was making cake for a moment there. So I dumped in the second box and that seemed to work out better. the dough was wet and there was no way I was going to roll it into balls, but it was scoopable. I love my scoops. Do you have any? If not, you should get some. I have a 1 tbsp scoop and it made the perfect size cookie. The dough flattened out and I ended up with cakey goodness. *grin*
For the frosting, I know I saw this technique on Pinterest but for the life of me I can’t find it again. It’s there somewhere, and if I ever find it again I’ll add a note here, but to whoever it was – thank you! This is such an easy way to frost cookies. I’m still working a marshmallow frosting, but it is also doable. This is really easy, you ready? On the hot cookies, about 1-2 minutes before they come out, set a Hershey Kiss on top. Finish out the two minutes, pop them out and wait 1-2 more minutes and then spread – viola! The marshmallows still need work, but only because it’s not as pretty as the chocolate. The technique I saw involved marshmallows (I’m 90% sure), so there’s a way, I just haven’t figured it out yet. *grin* But seriously, the next time you’re making cookies and you want to frost them – get some Hershey Kisses.
Overall, the cookies came out great. Jesse definitely liked them as the second batch hadn’t even came out of the oven yet before he was taking a plateful downstairs with him. I’m definitely going to try these again and so using a variety of cake mixes too. Mmmm….I wonder if I could simply put a dollop of frosting on top of the cookies instead of the Hershey Kiss and get the same result. If so – carrot cake cookies! Quick! I need another reason to make cookies!
One more thing before the actual recipe is written out. Since I attempted this using left over cake mix, and my measurements ended up being wrong anyway, I’m going to write out a recipe for what I think will work using a full box of cake mix. So the following hasn’t been tried…yet, but I’m assuming it will work. The only thing to remember is my dough was wet this time around, so if that’s important or not tends to be seen.
Ingredients:
2 boxes of dry cake mix
1/2 cup vegetable oil
2 eggs or 1/2 egg substitute (aka Egg Beaters)
Directions:
- Mix all ingredients together until well blended.
- Spoon mixture onto a cookie sheet using a 1 tbsp scoop (or whatever size you want) and bake for 10 minutes.
- Before taking the cookies out of the oven, place a Hershey Kiss on the top of each cookie and bake again for 2 minutes.
- Let the cookies cool for a couple of minutes, and then using a spoon, spread out the chocolate until it covers the entire cookie.
Note: You do want to give the cookies time to cool down enough so they won’t crumble. You know how when you’re frosting a cake and you try to do it too soon and the cake starts following the frosting wherever the knife takes it? Yeah, the cookies do the same thing. So make sure the “skin” is cool enough that it doesn’t mean while your spreading the chocolate around.
Yield: 6 dozen
December 15, 2012
· jackie · 39 Comments
Posted in: Uncategorized
Cake Batter Rice Crispy Treats
I recently came across a recipe for Cake Batter Rice Crispy Treats over at Gimme Some Oven and I so had to try them. I mean seriously – cake batter and rice crispy treats – who could pass that up. I did try them and if I make them again, I would have to make a couple of adjustments. Although I did make one large one right away – I made these via my slow cooker. Hell yeah, that was probably the best part right there. I didn’t have to stand over a stove, waiting for marshmallows to melt, constantly stirring. Nope. I threw everything into the slow cooker and came back an hour later and stirred everything up. It was awesome and I doubt I’ll ever make rice crispy treats on the stove ever again.
The original recipe only calls for about 1/3 cup of cake mix, but that is so not enough. I knew that going in and actually made mine with 1/2 cup and that still wasn’t enough. Well, it depends on the type of cake mix used I guess. For yellow cake, it made the rice crispy treats taste more like a sugar cookie than cake batter – not really what I was hoping for. I made another batch with Devil’s Food cake and that was yummy. It gave the rice crispies a nice chocolate flavor without all the mess that comes with adding chocolate chips. I also used chocolate sprinkles for this one and that worked out nicely as well. However, I don’t think I would recommend using the Devil’s Food again – if you’re going to do it, go straight for the actual chocolate cake mix, or better yet trifle fudge cake mix. *grin* The other nice thing about using chocolate cake mix to make chocolate rice crispies is they don’t turn that brown. The picture below is of the chocolate variety as the yellow were given away before I remembered to take a picture.
Overall, these came out nice, but I think I actually prefer the originals more. It just wasn’t cakey enough for me. The one thing I will discourage is you can’t make these as a double batch. Not in the slow cooker at least. Unless you have a rather large one, there’s not enough room once you have all the melted marshmallows and cereal together – not for a double batch. If you want to try, go for it, but I couldn’t do it.
 Ingredients:
3 tbsp butter
1 (16 oz.) bag of marshmallows
2/3 cup cake mix (the dry cake mix, not prepared into a batter!)
6 cups crispy rice cereal
1 container of sprinkles (optional)
Directions:
- Combine the butter and marshmallows in a 3- to 4-quart slow cooker.
- Cover and cook on LOW setting 1 hour. Add cake mix and stir until well blended. Stir in cereal, and half of the sprinkles if using, so it is completely coated with marshmallow mixture.
- Either drop the mixture by tablespoons onto wax paper or press into a baking dish – top with remaining sprinkles. Let it sit for 30 minutes (give or take), then enjoy! Store in an airtight container.
Note: If you spread these out on a cookie sheet, they’ll be thin as a single batch. I did that, then once they cooled, folded them on each other. They came out as a nice thick block and made cutting them a little easier too.
December 14, 2012
· jackie · 17 Comments
Posted in: Dessert
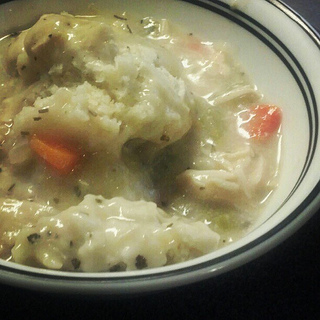
Chicken Stew with Herb Dumplings
I keep experimenting with Chicken and Dumpling recipes and this time I’m actually tweaking one of my own. This time though, I didn’t want to do it on the stove and I wanted to make it a little less needy, so I’m not tweaking it too much.
When it comes to the slow cooker, I rarely measure out the veggies. Like today, I had a bunch of carrots and celery in the fridge, so I dumped all the celery in and half of the carrots. After dicing them of course. If you’re looking for a measurement, I generally do anywhere from 1/2 cup to 2 cups. This time around, I’m adding greed peppers to the mix, but not too much. I found diced onions and green peppers in the frozen veggie section at the store and I love using them. I can add a little or a lot – it doesn’t matter because I’m not having to waste the rest of the veggie. It’s awesome. I always keep a bag of both in the freeze now because it’s so easy to add that touch of onion/green pepper to any dish – meatloaf, chicken, soups, etc – it’s all good. So I did add a little diced green pepper, but just enough to give the stew some flavor and not becoming over powering. Maybe about 1/4 cup if that. The onions…my boys love them, so I rarely have to worry about how much I put in.
I ALWAYS measure the spices, so those are generally a good guideline. I’m still tweaking the amounts, so if you try this and find something that works better, I would love to know about it. I’m planning on shredding the chicken once it gets closer to dinner time, so cook it whole or dice it – it’s up to you.
 Ingredients:
2 cups sliced carrots
1 cup chopped onion
1/2 cup sliced celery
1/4 cup or less diced green peppers
2 cans (14oz each) of chicken broth
2/3 cup all-purpose flour
1 cup water
3 boneless skinless chicken breast, cut in half
1 tsp dried basil leaves
3/4 tsp dried rosemary
1/4 tsp dried tarragon
3/4 to 1 tsp salt
1/4 tsp black pepper
Herb Dumplings: (recipe is doubled already)
2 cup biscuit mix
1/2 tsp dried basil leaves
1/2 tsp dried rosemary
1/3 tsp dried tarragon
2/3 cup reduced fat (2%) milk
Directions:
- Layer the chicken breasts along the bottom of a slow cooker. Layer on top the carrots, onion, green peppers and celery. Next add all the spices, leaving out the flour. Stir in chicken broth. Cover and cook on high 3 hours.
- Stir flour in 1 cup of water until smooth. Stir into slow cooker. Cover and cook 1 hour or until vegetables are tender and chicken is no longer pink.
- For Herb Dumplings: combine biscuit mix and herbs in small bowl. Stir in milk to form soft dough. Spoon dumpling mixture on top of stew with a scoop or spoon. Cook, uncovered, 30 minutes. Cover and cook 30 to 45 minutes or until dumplings are firm and toothpick inserted in center comes out clean. Serve in shallow bowls.
December 13, 2012
· jackie · 7 Comments
Tags: Slow Cooker · Posted in: Soup
Bacon Mac & Cheese
I love macaroni and cheese, especially the mass produced version that you often find in buffets. So I’m always on the lookout for a good mac and cheese recipe. A little while ago, I forget where, the idea of Bacon Mac & Cheese started bouncing around in the house and I knew I had to make it.
I had originally planned to use a recipe I found over at Babble.com, but their recipe called for Progresso™ Recipe Starters™ Creamy Three Cheese cooking sauce and I have no clue where to find it. Granted, I didn’t look too hard, but my local grocery chain store didn’t have it and I would rather not use something that can be hard to find. So I started looking again and saw the recipe for Panera’s Mac & Cheese and knew I could work with that.
As usually when it comes to cheese, I didn’t really follow the directions but used them more like guidelines. I like cheese and I like it a little thicker than the blue box variety. So I ended up using more cheese that I should have (about 6 cups worth). Since I’ve adjusted the recipe below from what we had for dinner, I’m going to assume that the cheese won’t be as thick in the picture, but it should still be a pretty good consistency. Also, for the bacon, it needs to be crispy. When I made it earlier, it baked right in the grease so it came out chewy and soft. While this worked for the recipe, it didn’t dice up well. I ended up with bigger chunks and bites without bacon. So Jesse and I are thinking that by making it crispier (and maybe baking it on racks so the grease drips off), we’ll be able to dice it into smaller pieces and it’ll spread out more among the pasta.
There is one more thing I would recommend when making this. If you have bacon lovers in the house, make sure you hire an armed guard. I made the bacon an hour before I did the rest and they kept coming into the kitchen, wanting to eat the bacon. I had to turn them away a couple of times, so while I say use a whole package of bacon, I did keep out four slices so they would stop asking for some. *grin*
Overall the boys loved this. Even Simon, who has been really picky of late, had his plate cleaned before I even had a chance to try it. Jesse wasn’t far behind him either. Ian said it was good as well, but he doesn’t recommend it if your throat is bothering you (he currently has a cough that is making his raw). I enjoyed it as well, but yeah, 6 cups of cheese was a bit much. I’m also thinking that next time I’ll be adding some broccoli and chicken to the mixture (or maybe substituting it for the bacon), to make it a little different. I’m thinking there’s a bunch of possibilities for this.
 Ingredients:
1 (16-oz.) package penne pasta
1/4 cup butter
1/3 cup all-purpose flour
2-1/2 cups 2% reduced-fat milk
2 cups shredded Italian Five-Cheese
1 cup (8 oz.) shredded extra-sharp Cheddar Cheese
1 pkg extra thick bacon, cooked and diced well
Paprika (optional)
Directions:
- Preheat oven to 350 degrees.
- Place bacon on tin-foil lined baking sheets and bake for 20-25 minutes. Once done, immediately remove bacon from the grease and pat dry. Be sure to leave the oven on for the pasta, if baking.
- Prepare pasta according to package directions. Drain pasta and pour into a 9×13 pan.
- Melt butter in a sauce pan over low heat. Whisk in flour and milk; cook over medium heat, whisking until mixture thickens and is bubbly. Remove from heat.
- Add cheeses, stirring until cheese melts and sauce is smooth. Add bacon and mix well.
- Pour sauce over pasta and stir. If desired, sprinkle more cheese (not cheddar), over pasta. Bake for 10-15 minutes or until cheese is melted/heated. Serve immediately.
October 20, 2012
· jackie · 12 Comments
Posted in: Main Dishes, Pasta
No-Bake Chocolate Chip Granola Bars
Jesse has been wanting to make granola bars for awhile now; so when I came across Lauren’s Latests No-Bake Chocolate Chip Granola Bars, I knew I had something I could do. As with all recipes I try, I always follow the directions pretty close. Okay, so maybe not always, but this time I did. I wanted to make sure these turned out since there wasn’t any baking involved before I started messing with them. The one thing I am worried about is keeping them together. Lauren is saying they should, but if they don’t then I probably didn’t pack them tight enough. It can’t be because they are too thin – who wants thin granola bars? At least I’m pretty sure my bar pan will make sure they are thick enough. *grin* So far, they seem to be working pretty well.
Now that I’ve tried the recipe, I already have ways of changing it tumbling around in my mind. The first change is going to be reflected below. I’m thinking there is entirely too much honey involved. There is a strong honey taste, so I’m thinking the 1/2 cup is a bit much, so I’m changing it to 1/3 cup. I may take it all the way down to 1/4 cup, but without trying it just yet, I’m going to say a 1/3. I like the idea that it’s a natural sweetener, so I don’t want to take too much out of it.
On the plus side, I might be able to make this work to my benefit. If I add 1/2 cup of SunButter (so they’ll be nut-free), the honey might help with the SunButter taste (which I’m slowly getting used to, but it still doesn’t beat peanut butter). Another variation I want to try is adding some flaxseed and protein powder to boost the nutritional facts a little. Good fats and protein is a good thing to have after all. I also want to try adding in various fruits and coconut and that will definitely be tried next time. *grin*
The best part about this recipe, in my opinion, is most of these ingredients are already in my pantry, so making them on the fly should be pretty easy. The only thing I might not have on hand is the rice cereal, but I’m thinking that will be easy to substitute or if I even need it at all. Simply adding some granola or leaving it out entirely may also be an option. Either way, this is definitely something I’ll be trying again and soon.
Ingredients:
1/2 cup butter
1/3 cup honey
2/3 cup packed brown sugar
4 cups quick cooking oats {not rolled oats!}
2 cup crispy rice cereal
4 tablespoons mini chocolate chips
Directions:
In a large bowl, stir oats and rice cereal together. Set aside. In a small pot, melt butter, honey and brown sugar together over medium high heat until it comes to a bubble. Reduce the heat and cook 2 minutes. Pour in vanilla and stir. Pour over dry ingredients and mix well to moisten all ingredients. Pour into lightly greased small cookie sheet and press out to be about 3/4 inch in thickness. Sprinkle with mini chocolate chips and press down lightly. Cool on a countertop to room temperature for two hours or until the chocolate chips are set before cutting into bars. Wrap in parchment or plastic wrap and store at room temperature.
Recipe Notes: If your granola bars don’t seem to be staying together when you cut them, you may have made them too thin or you didn’t pack them in tight enough. Stick them in the fridge for 20 minutes and that should help keep them together. {Be sure not to keep them in there too long or else they’ll become super hard!} The next time you make them, try reducing the butter to 3 tablespoons and really packing them down.
Nutritional Information: Servings 20 bars; Calories 143; Fat 23g; Carbs 4g; Protein 3g (as determined by MyFitnessPal.com)
July 24, 2012
· jackie · 267 Comments
Posted in: Snacks
Nut-Free Chocolate Protein Bar
Since I’ve started taking the whole losing-weight thing seriously, I’ve been trying protein bars more and while I’ve found some good ones, I haven’t been able to find any that are nut-free. While this may not be a bad thing, it is when your nut allergy son wants one as well. *grin* So since I haven’t been able to find a nut free protein bar, I decided to make my own. I can’t take full credit though. My friend Colleen had this yummy protein ball recipe and I decided to build upon that.
The original recipe, while yummy, was a little bland for me. For one it has peanut butter in it and right there means it wasn’t what I was looking for. The other reason I decided to build upon it was simply because I love chocolate. You can never go wrong with chocolate and peanut butter, so to help with the SunButter taste, I added cocoa powder. Although I haven’t decided yet if I want to add 2 tbsp of dark cocoa powder or not yet.
Ingredients:
16oz SunButter
1 tbsp Special Dark Cocoa Powder
1/4 cup Flaxseed Meal
1 cup protein powder (This is the one I used)
1 cup dry milk
8 tsp Splenda
2 tsp Glutamine powder
1/4 quick-cooking oats (or 1/2 cup ground oatmeal)
Directions:
Mix all dry ingredients together. Once everything is blended, add the SunButter.
Spread the mixture into a 8 3/4″ x 6 1/2 pan and freeze overnight.
Nutritional Information: Servings 12; Calories 330; Carbs 18g; Fat 21g; Protein 18g (as determined by MyFitnessPal.com)
July 23, 2012
· jackie · 25 Comments
Tags: Gluten-Free, Nut-Free, Vegan · Posted in: Snacks
Dark Chocolate Coconut Treats
I love coconut and chocolate, especially Mounds and Almond Joy, so when I came across Tasty Yummies recipe for these delicious Dark Chocolate Coconut Treats, I had to try them. These are Vegan, Gluten-free and Refined Sugar-Free, which means they are perfect for the boys and they are completely unprocessed (I’m starting a clean eating diet today, so perfect timing).
For once, I actually followed the recipe pretty closely, except for a few small things. For one, instead of 6oz of 100% unsweetened organic dark chocolate, I just used whatever bakers dark chocolate my store had. I highly doubt it was 100% organic, so whether this makes the recipe no longer vegan, I’m not sure. I’m hoping not since I used Nestle, but you never know. Plus I used 8oz of chocolate since the bars I bought were in 4oz packages. Waste not, right? Especially chocolate. *grin* I did end up with some chocolate left over, but that may be due to the fact my boys got into the coconut bites before I added the chocolate.
Also, I was actually kind of surprised at how easy it was to find coconut oil. It’s something I never looked for and thought I was going to have to hunt it down; but nope, it was sitting pretty next to the olive oil, so look there first. *grin*
The biggest difference I noticed was Tasty Yummies said this recipe made 12 cups, but I used my mini-muffin pan and ended up with 36 cups. This made them more bite sized and perfect for little hands since they always want more than one. One last thing, these have to be stored either in the refrigerator or the freezer. If you try keeping them on the counter, expect to find coconut chocolate puddles instead of bites.
Now that I’ve made these, there is another change I would do. It will involve changing the chocolate topping to something a little more “dippable”. Freezing the coconut mixture came out fine; but after adding the chocolate topping and freezing again, that’s where I ran into a problem. They started falling apart once I tried getting them out of the muffin pan. Jesse came up with a good idea and that was to dip the coconut mixture in the chocolate, so the whole thing is coated and not just the top. I like this idea as the coconut mixture was easy to get out. And hell who doesn’t like chocolate covered anything. *grin* So I will be changing the chocolate dipping, but not right now. I’ll update the recipe once I try this recipe again…which will probably be soon since I have this big container of coconut oil to use. *grin*
Coconut Filling:
2 1/2 cups unsweetened coconut, finely shredded
1/2 cup melted coconut oil
1/4 cup maple syrup or honey
1 tsp vanilla extract
Chocolate Topping:
8 ounces unsweetened dark chocolate (aka bakers chocolate)
1 tbsp coconut oil
1/3 cup maple syrup or honey
Directions:
In a large mixing bowl, combine all of the coconut filling ingredients and mix together until well combined. Evenly divide up the filling between the 12 muffin cups, pressing it in very tightly, making sure it is even. Don’t worry they won’t stick. Place the muffin pan in the freezer make sure it is sitting flat, and freeze until hard, about 30 minutes.
While the coconut filling is cooling, melt the dark chocolate with the coconut oil. Either very carefully in a double boiler setup on the stove top or in small increments in the microwave. After the chocolate and coconut oil is melted and whisked together and well combined, remove from the heat (if you melted it on the stove), and add in the maple syrup. Stir well to combine. Give the chocolate topping a little taste to see if you want it any sweeter. Add more syrup, if you wish. Take the muffin tin with the frozen coconut mixture out of the freezer, and divide your chocolate mixture over it, spooning it on top and smoothing the chocolate out to make sure it totally covers the coconut.
Put the muffin tin back into the freezer, and freeze until the chocolate has set, about another 30 minutes or so. To get the treats out of the pan, slide a knife around the outside of the treat and it will very easily pop out.
Nutritional Information: Servings 36; Calories 142; Carbs 13g; Fat 11g; Protein 1g (as determined by MyFitnessPal.com)
July 22, 2012
· jackie · 6 Comments
Posted in: Dessert
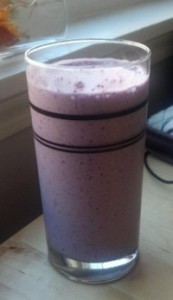
Strawberry Blueberry Oatmeal Protein Smoothie
I’m attempting to lose the weight I’ve gained since high school and I’ve been experimenting with protein smoothie. I’m not a huge water drinker and drinking protein water….not happening. So smoothies it is. I’m a pinterest junkie and during one my recent forays into madness, I came across This Chicks Cooks’ Berry Banana Oatmeal Smoothie. I’ve never thought about putting oatmeal into a smoothie before, but I do know that oatmeal is exceptionally healthy for you, so I was game to try it. It’s really tasty and I have a feeling I’ll be adding oatmeal.
However, while I was making it, I started thinking. I like the antioxidants blueberries have and have been adding them to every smoothie I’ve been making. Plus I have protein mix that I’m suppose to be using as well, so I’ve kind of made my own smoothie based on This Chick Cooks recipe.
For my protein, I use Body Fortress – Super Advanced Whey Protein, which is about 26g of protein per scoop. Depending on which type of protein powder you use, the calorie count I’m including may be a little different. In addition, I use store brand frozen fruit instead of fresh as it’s more convenient to have on hand. If you are using frozen fruit, I suggest crushing it up before adding the ingredients. It’ll make blending it all together easier. I also blended the fruit and oats separately before adding all the ingredients. I wanted to make sure everything was tiny enough for a smoother blend.
 Ingredients:
1/2 cup frozen strawberries
1/2 cup frozen blueberries
1/2 cup oatmeal
2 scoops of whey protein powder
1 banana
1 cup milk
1/2 tsp vanilla
Directions:
If using frozen fruit, blend/crush up the fruit. Taking the fruit out, put the oats in the blender and let it run until they are ground up to as close of a powder as desired. Add the remaining ingredients and blend until smooth.
Nutritional Information: Servings 2; Calories 374; Carbs 47g; Fat 6g; Protein 35g (as determined by MyFitnessPal.com)
July 20, 2012
· jackie · 5 Comments
Posted in: Beverages
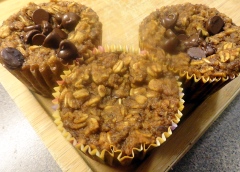
Baked Oatmeal Muffins
With Simon’s wheat allergy, breakfast options have been a little limited in the household. I mean, without wheat and eggs, there’s not too much you can do. Well, at least not what I currently know, so I’ve been on the lookout for more breakfast ideas. All the boys love oatmeal, but when you tend to wake up 15 minutes before you need to be out of the house, it’s a little hard to make it in the mornings. So when I came across Suger-Free Mom’s Personal Sized Baked Oatmeal recipe I knew I had to try it.
With all new recipes, I pretty much went by the recipe as it originally was, however I did make a few changes. The main one being the use of Stevia. I don’t have that in stock and I’m not afraid of using sugar, so I substituted the 6 packets of Sweetleaf Stevia for the equivalent of 4 tbsp sugar. I also, now that I have read the recipe again, added a bit more banana. For some reason I thought it said 1 cup mashed, not 1 banana, so that’s another change. This may explain why the oatmeal muffins came out a little softer than I thought they should’ve been. *grin*
Other than that, I kept everything pretty much the same. If you can’t find flaxseed meal, you can also just get the flaxseed and then grind them up yourself. That’s what I did since I couldn’t find the meal and didn’t want to try and hunt it down.
Overall, I have to say that I love this recipe. I have never used flaxseed before and was a little leery of it, but I have to say that it was fine. I’m not sure what it’s suppose to taste like, and since I don’t know I can’t taste it. So I’m all good. Due to my slight error with the bananas, the muffins did come out a little softer than I thought they would, but they did firm up the longer I allowed them to cool. I’m thinking once I start pulling them out of the freezer (because the recipe makes 2.5 dozen muffins), they’ll be perfect for the boys to munch on.
The other beautiful part about this recipe is you can add whatever toppings you want to it. I have a house full of chocoholics, so I added a couple of chocolate chips to the top and it added just enough sweetness to be perfect. Since they are muffins, you don’t have to do all 2.5 dozen with chocolate; you can do a couple with raisins or fruit or leave it plain. This leaves a lot of possibilities open, and in my opinion, means it’ll be very easy to play with. I’ve already started a new batch with a few changes that I’m really hoping will work.
One last thing, this batter ends up being really soggy and wet and I ended up with some pretty soft muffins. When you think of muffins, you want to just be able to peel the wrapper off and go to town. You can do that with these, but they are a little messy as they fall apart easily. Again, they are firming up as they cool off, so we’ll see if this remains true in the morning; but if you’re looking to make them a little firmer straight from the oven (and thus can eat them like muffins), I would cut back a little on all the liquid. I haven’t tried it yet, and I think I’m going to, so don’t quote me on that. If anyone does do it, I would love to know how it turns out.
Updated 4/10/12: I’ve found that adding an extra cup of oatmeal firms up the muffins beautifully. It doesn’t make them dry at all and I don’t end up with them falling apart when I try to take the wrappers off of them. In fact, I’m adjusting the recipe below to reflect this. So if you want the original amount of oatmeal for this recipe, it’s 5 cups. The 6 cups is to make them more firmer.
Updated 7/23/12: Oh! I’m making another change….protein! Since I’m getting on an “eating clean” and protein diet to help the weight loss, I’m adding 3 scoops of a protein powder.
 Ingredients:
1/4 cup egg beaters
2 cups applesauce, unsweetened
1 tsp vanilla extract
3-4 mashed bananas
4 tbsp sugar
1/4 cup ground up flaxseed
1 tbsp ground cinnamon
3 tsp baking powder
1 tsp salt
6 cups old fashioned oatmeal
2 3/4 cups milk
2 scoops of Body Fortress – Super Advanced Whey Protein
Directions:
- Preheat oven to 350 degrees.
- Mix eggs, vanilla, applesauce, banana and Stevia together in a bowl.
- Add in oats, salt, baking powder, flaxseed, protein powder and cinnamon – mix well with wet ingredients.
- Finally pour in milk and combine.
- Spray a 12 and 6 capacity muffin tin with cooking spray or use cupcake liners.
- Pour mixture evenly into muffin tin cups.
- If using toppings add them onto the tops of muffins now. If using fresh or frozen fruit, drop it right into the batter.
- Bake 30 minutes until a toothpick in center comes out clean. Cool and enjoy or freeze them in gallon freezer bags.
Nutritional Information: Serving 36 muffins; Calories 97; Carbs 14g; Fat 2g; Protein 5g (as determined by MyFitnessPal.com)
Variation: Baked Oatmeal Zucchini
March 19, 2012
· jackie · 6 Comments
Tags: Diabetic Friendly, Low Fat, Wheat-Free · Posted in: Breakfast, Muffins


