
Sugar Free Lemon Meringuesque Cake
When my cousin got married, she had asked me to do a sugar-free cake for her reception. Since it was for a wedding reception, I wanted to do something special so I thought I would attempt a Lemon Meringue style of cake. The cake did come out good, but this recipe definitely needs some work. The cake itself was a little dry, so something needs to be adjusted there.
The other thing I’m not happy with is the meringue part. Using it as a frosting just didn’t work. Well, it does work, but since the meringue part does need to bake, you have to bake it on whatever you want to display it on. I don’t know about anyone else, but my baking sheets are really not that special. While, I do love using my stoneware and will use that before reaching for a metal sheet, my is getting to be in really good shape. Meaning it’s turning all shorts of shades of brown and black (remember, the darker the stone, but the better). So while I could’ve displayed the cake at the reception on my stone pan, I didn’t want to. So what I’m thinking is add the meringue as part of the filling or as another layer. Then once the cake comes out, adding a layer of whipped cream to the top. Of course, I would clean up the edges, maybe trimming off a little so it was pretty and square, but that’s what I’m thinking.
As for the fact that it’s sugar-free, I did use a straight 1:1 ration sugar substitute, so anyone should be able to use regular sugar and make this totally decadent. If anyone does take a stab at this and end up with something good, let me know.
Ingredients:
Cake:
4-1/2 cups all-purpose flour
2 tsp baking powder
1-1/2 tsp baking soda
1/2 tsp salt
1-1/3 cup butter or margarine
3-1/2 cups sugar substitute
4 eggs
2 tsp vanilla
Lemon Filling:
2 cups sugar substitute
1/2 cups cornstarch
2 cups water
4 egg yolks, slightly beaten
1/4 cups butter
2 tsp grated lemon
2/3 cups lemon juice
2 drops yellow food coloring (optional)
Directions:
- Make the Lemon Filling 12-24 hours in advance: Mix sugar and cornstarch in saucepan. Gradually stir in water, and cook over medium heat stirring constantly, until mixture thickens and boils. Boil and stir 1 minute, gradually stirring in the egg yolks. Stir and boil 2 minutes. Remove from heat, stir in butter, lemon peel, lemon juice and food coloring (optional). Refrigerate until next day. Save the egg whites for the meringue.
- Make the Cake: Preheat oven to 350 degrees F. Grease and lightly flour two 9×1-1/2 inch round baking or one 13x9x2 baking pan; set pan(s) aside. Stir together flour, baking powder, baking soda and salt. Set aside.
- In a large mixing bowl, beat the the butter or margarine with an electric mixer on medium to high speed for 30 seconds. Add sugar; beta til well combined. Add eggs, one at a time, beating well after each. Beat in vanilla. Add dry mixture and 1-1/4 cups water alternately to beaten mixture, beating on low speed after each addition just until combined. Pour batter into the prepared pan(s).
- Bake for 30 to 35 minutes or until a wooden toothpick comes out clean. Cool layer cakes in pans on wire racks for 10 minutes. Remove layer cakes from pans. Cool thoroughly on racks.
- Assemble Cake: Spread the meringue around the outside of the cake and dots some on the top of the cake. Preheat oven to 350°F and return cake to oven; bake until the meringue is golden brown.
 December 13, 2010
·
December 13, 2010
·  jackie ·
  One Comment
 Posted in: Cakes & Pies
Inside-Out Lasagna
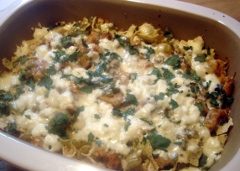
A couple of weeks ago, we tried the Inside-Out Lasagna recipe from the Pampered Chef Stoneware Inspirations cookbook and it was a hit. I love lasagna and this made it really easy to make. Not only was it easy, but it’s totally a recipe that could be made in advance and then baked later on.
We only had two issues with this one. The first being the pasta. The bow tie was nice, but at times it was kind of hard to cut through the layer of pasta on the bottom. The second time I made this, I used rotini pasta instead and I think it’s going to work out a little better. I haven’t cut into it yet since it’s currently sitting in my freezer, waiting for a night where I need something to throw into the oven.
I’ll be honest, I love cheese and it seemed like there was a lot of ricotta cheese, but once you bite into it, that’s not really the case. There’s a really good balance and I generally add more cheese to recipes because there’s never enough – I have no intention of adding more this time around. Well, I might add a little Parmesan once it gets to the table, but that’s it.
Overall, this is a great recipe and super easy to make.
Ingredients:
1pkg (12oz) uncooked bow tie pasta
1/2 medium onion, chopped
1.25 lbs lean ground beef or Italian sausage links, casings removed
2 garlic cloves, pressed
1 jar (26oz) marinara sauce
1 can (14.5oz) diced tomatoes in juice
4 eggs
1 container (32oz) part-skim ricotta cheese
2 cups (8oz) shredded mozzarella cheese
1/2 cup (2oz) grated fresh Parmesan cheese
2 tbsp snipped fresh parsley or 1 tsp dried parsley
1/2 tsp salt
1/2 tsp black pepper
Directions:
- Preheat oven to 350 degrees F. Cook pasta according to package directions.
- Place chopped onions and ground beef in skillet. Cook and stir over medium heat 8-10 minutes or until beef is no longer pink, breaking beef into small crumbles. Press garlic into beef mixture. Stir in pasta cause and tomatoes; remove from heat.
- In mixing bowl, lightly beat eggs with a whisk. Add cheeses, parsley, salt and black pepper; mix well.
- To assemble lasagna, place cooked pasta into the bottom of a 13×9 pan. Top with meat mixture. Spoon ricotta mixture over sauce; spread evenly. Bake uncovered, 1 hour or until ricotta mixture is set and lightly browned.
Yield: 15 servings
Nutritional Info: 340 calories; 15g total fat; 8g saturated fat; 120mg cholesterol; 27g carbohydrate; 25g protein; 740mg sodium; 2g fiber
Diabetic exchanges per serving: 1.5 starch; 3 medium-fat meat (1.5 carb)
Cook’s Tip: This recipe can be prepared one day in advance. Prepare recipe through step 4; do not bake. Cover; refrigerate overnight. When ready to bake, remove from refrigerator; let stand at room temperature 30 minutes. Bake uncovered, 1 hour 15 minutes or until lightly browned and edges are bubbly.
December 12, 2010
· jackie · No Comments
Tags: Dinner Rotation, Italian · Posted in: Chicken, Pasta
Fiery Chocolate Torte
A while ago, Jesse wanted to take something into work, but he didn’t really know what. I had just gotten the Simple Sweet cookbook from the Pampered Chef, so I had him browse through it. He ended up coming across this recipe and kept coming back to it. I don’t have much of a spice tolerance, so I was iffy on it, but I’ll admit to being curious to see how it would turn out.
I’m not sure if I messed up my measurements with the cayenne pepper or not, but this definitely came out spicy. The recipe calls for 1/2 tsp of cayenne pepper in the cake mix and 1/4 tsp in the frosting and I can’t remember if I did use the teaspoon or if I grabbed the tablespoon instead. For me (and I heard for others as well), the cake was a bit too spicy, but I don’t want to change the measurements in case I did screw it up and the original ones are far better. So, if you do try this, just be warned that it may end up spicier than you think.
I did double the frosting recipe. There simply wasn’t enough to frost the entire cake. I don’t know if I made mine too thick or what, but be advised that it’s already been doubled once. One thing I would recommend is letting the frosting cool a little before attempting to frost the cake. It’ll make it a little easier to spread.
I’m not sure what size box of devil’s food cake I used, but I didn’t measure out the amount. According to the recipe, it says to use 1 – 9oz package of devils food cake or 1-3/4 cups of an 18.25oz box; I’m not sure how much of a difference this made to the recipe.
The cake itself, aside from the spiciness, was pretty good. If the spice was cut back a little, I would definitely make it again. However, I have to be honest, this is probably a recipe I won’t make again unless it’s requested. I’m just not a fan of spicy chocolate.
Ingredients:
Cake
1 (9oz) package of devil food cake mix
1/2 cup all-purpose flour
1/4 cup unsweetened cocoa powder
1/2 tsp ground cayenne pepper
1 cup buttermilk
1/2 cup vegetable oil
1 egg
Frosting
2 (8oz) pkgs cream cheese, softened
2 cup powdered sugar
4 tsp cinnamon
2 (12oz) container frozen whipped topping, thawed, divided
2 cup semi-sweet chocolate chips
1/2 tsp ground cayenne pepper
Directions:
- Preheat oven to 350 degrees. Spray two torte pans with nonstick cooking spray and dust with flour.
- In a mixing bowl, combine ingredients for cake; beat on medium-high speed with electric hand mixer 2-3 minutes or until smooth. Divide batter equally between pans, spreading evenly to edges.
- Bake 10-12 minutes or until wooden pick inserted in centers come otu clean. Remove pans from oven to a cooling rack; cool 5 minutes. Invert one cake onto serving platter. Invert second cake onto cooling rack. Cool completely.
- In a mixing bowl, combine cream cheese, powdered sugar and cinnamon; whisk until smooth. Fold in 2-1/2 cups of the whipped topping. Place one cake layer well-side up onto serving platter. Spread half of the filling over cake layer. Stakck remaining cake layer on top of first, well-side up; spread with remaining filling.
- Combine remaingin whipped topping, chocolate chips and cayenne pepper in a microwave safe bowl. Microwave, uncovered, on high 40-60 seconds or until melted, stirring every 20 seconds. Whisk until chocolate is thickened, smooth and glossy. Frost torte with frosting.
Nutrional Info: 360 calories; 22g total fat; 11g saturated fat; 30mg cholesterol; 39g carbohydrates; 5g protein; 200mg sodium; 2g fiber.
Diabetic exchanges: 2 starch, 1/2 fruit, 4 fat (2-1/2 carb)
December 11, 2010
· jackie · No Comments
Posted in: Cakes & Pies
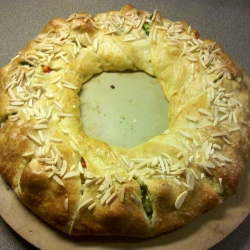
Chicken & Broccoli Ring
 I’ve already made awhile ago the Chicken and Broccoli Ring, but this time around I did a few things different, so I wanted to give it a new post. Honestly, I didn’t realize this recipe had already been published until this morning, otherwise I probably would have used it. As it is, the things I did differently aren’t that big, but I definitely think it made a much prettier product (if you want to read about the first attempt, click here).
The one change I did this time around was I used bigger crescent rolls. The one thing I remembered from the first time was that it seemed like there wasn’t enough crescent roll. I could be wrong, but when I saw the bigger packs, I went for those instead. I want to say the bigger package has fewer crescent rolls (only 6 instead of 8), but they spread out a lot easier and it didn’t seem like I was trying to squeeze in more rolls.
A second change is I didn’t use plain chicken. Before you make the ring, you have to brown the chicken in a skillet. This time, I mixed together some olive oil and Tastefully Simple’s Garlic Garlic and added a bit to the skillet. Then once the chicken breasts were added, I brushed both sides with the garlic mixture. I’m not sure how much of a flavor this added, but I know it smelled good. I want to say I only used about 2tbsp of the Garlic Garlic and 2-4 tbsp of the olive oil. The mixture was on the thick side and I wanted it that way so it wouldn’t run off the breasts as much once I did start brushing it on.
I remembered the cheese this time! I didn’t even add extra either, so we’ll have to see what the guys at Jesse’s work says with the cheese added. I also added onion to the mixture this time. I don’t know what it is, but I like adding onion to anything I make. I think it just enhances the flavor more or it could just be me. Who knows.
I can’t remember if I did it this way last time or if it was a lot more half-hearted, but when brushing egg whites onto the ring, make sure you do the entire ring, not just the top. After 30 minutes, the ring can out so beautiful that it shocked me. I don’t remember it being this evenly browned.
I think those are the major changes I did this time around. I personally prefer doing the ring, but this recipe can also be made using the wreath and braid recipes. Directions for these are here.
 Ingredients:
2 pkg (10oz) refrigerated crescent rolls
2 cups coarsely chopped cooked chicken
1-1/2 cups coarsely chopped broccoli
1 cup shredded cheddar
1/2 cup diced onion
1/2 cup diced bell pepper
1/3 cup mayonnaise
1 tsp Dill mix or dried dill weed
dash tsp salt
1 garlic clove, pressed
1 egg white, lightly beaten
1/4 cup slivered almonds
Directions:
- Preheat oven to 375 degrees. In a mixing bowl, combine chicken, broccoli, cheese, bell pepper and onion; mix well. In a small dish, mix together the mayonnaise, seasoning mix, salt and garlic; mix well. Combine the two mixtures.
- Unroll crescent rolls and separate into 16 triangles. Arrange triangles, slightly overlapping, in a circle on a round stone with wide ends 4 inches from the edge of baking stone. Points will extend off the edge of the baking stone. Using a baker’s rolling pin (or something small), roll the wide ends of dough toward center to create a 5-inch opening. Make sure you mesh the seams together so it’s all one big piece of dough.
- Using the a large (3tbsp) scoop, scoop filling evenly over dough in a continuous circle. Bring points of triangles up over filling and tuck under dough at center to form a ring – the filling will show. Brush with egg white. Sprinkle with almonds. Bake 25-30 minutes or until golden brown.
Yield: 8 servings
Nutritional Information: Calories 440; Total Fat 29g; Saturated Fat 8g; Cholesterol 50mg; Carbohydrate 25g; Protein 19g; Sodium 700mg; Fiber less than 1g
Diabetic exchanges per serving: 1 starch; 2-1/2 meat; 3 fat; 2 vegetable (1 carb)
December 10, 2010
· jackie · 2 Comments
Posted in: Chicken, Main Dishes
Cheesy Chicken Chilaquiles
I’ve been trying a bunch of Pampered Chef recipes and the latest one is the Cheesy Chicken Chilaquiles, which can be found in the 29 Minutes to Dinner, Volume 2 cookbook. This actually came out really tasty and I’m totally going to be adding it to our dinner rotation. However, I am making a few changes.
The first one being to the cheeses. The recipe originally calls for 2 cups of Chihuahua cheese and while this was good, it took me a bit to find it in the grocery store. It’s one of those imported/exotic cheese and I’m lucky Meijer carried it. However, the reason I’m changing it is simply the cost. I spent close to $8 on the cheese along for this recipe and that’s ridiculous. Maybe I’m being cheap, but why go that route when the Chihuahua cheese can be substituted with Monterey Jack? For the Queso Fresco (a/k/a Queso Blanco), there’s a substitute for that as well and I’ll be using the Farmer’s Cheese for that the next time around.
For the seasoning, I already had Taco on hand, so I didn’t see a reason to find the special Southwestern Seasoning Mix that the Pampered Chef sold. Especially not for one recipe. I don’t know what makes that certain seasoning special, but Jesse really liked it with the taco. I did put more than the 1 tbsp the recipe calls for, but I didn’t put on as much as one normally would with taco seasoning. Basically, while I was cooking the chicken, I threw in 1/4 cup of water and sprinkled a bunch of the taco seasoning on. BUT I did do something different while cooking the chicken. Instead of cooking all the chicken at once, I split it into two batches. The first had the seasoning/water added straight to the pan; the second one soaked in the seasoning/water while the other was cooking. I’m not sure if this made a difference, but I think the chicken came out a little moister than normal because of it.
Oh yeah, one thing I did forget about. This recipe was designed to be done in the microwave with the Pampered Chef Deep Covered Baker. However, I’m not a big fan of microwave cooking – it takes more effort than throwing something in the oven – so I didn’t. Instead, I skipped the first step and just browned the chicken in taco seasoning via skillet and then started with step 2. I baked the dish in the oven, at 350 degrees F, for about 30-45 minutes. Since I did still use my deep covered baker, which is stoneware, I kept it in the oven closer to 45 minutes and it came out perfectly.
Otherwise, the family really liked the Chilaquiles. It’s definitely something we’ll be making again. Jesse’s only comment: “they are tasty”.
 Ingredients:
1-1/2 lb boneless, skinless chicken breasts
1 tbsp taco seasoning mix
1-3/4 cups salsa verde
1 cup 33% reduced sodium chicken broth
3/4 cup chopped cilantro
12 cups authentic tortilla chips
2 cups shredded Monterey Jack cheese
1 cup crumbled queso fresco
sour cream
Directions:
- Cut chicken into 1-in pieces. Combine chicken and seasoning mix in skillet and cook; mix well. Spread chicken evenly over bottom of baker. Microwave, covered, on HIGH 4 minutes; stir to separate chicken. Microwave, covered, an additional 4 minutes or until chicken is no longer pink. Drain.
- Combine salsa and broth. Chop cilantro. Arrange half of the tortilla chips over bottom of same baker, breaking chips; top with half each of the chicken, salsa mixture and cheeses. Sprinkle with ½ cup of the cilantro. Repeat layers one time, ending with cheeses.
- Microwave, covered on high 5-7 minutes or until cheeses are melted and most of the liquid is absorbed. Let stand, covered, 5 minutes. Sprinkle with remaining ¼ cup cilantro. Serve with sour cream, if desired.
Yield: 8 servings
Nutritional Info: 410 calories; 19g total fat; 8g saturated fat; 85mg cholesterol; 30g carbohydrate; 30g protein; 680mg sodium; 1g fiber
Diabetic exchanges: 2 starch, 2 medium-meat, ½ fat (2 carb)
October 18, 2010
· jackie · No Comments
Tags: Dinner Rotation, Mexican · Posted in: Chicken
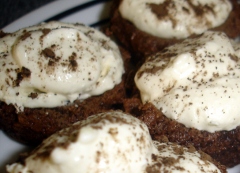
Chocolate Tiramisu Bites
On the cover of the latest edition of the Pampered Chef Best Season’s Recipe Collection are these mini chocolate tiramisu cakes and they looked really good. So I had to attempt them, but I’m not calling mine “mini cakes”. They are very much bite-sized and easily consumable if you’re not careful. *grin*
I generally don’t like adjusting measurements when I first attempt a recipe, but this time I did. The original recipe calls for one tablespoon of water, but while I was mixing the batter, it was so thick and uncooperative, that I added two more tablespoons. Even after adding the additional water, it was still a little thick, but I don’t think it messed up the recipe at all. In fact, I would almost suggest adding a little more water to make it easier to scoop the batter into the muffin cups.
Speaking of the muffin cups, if you don’t have a small scoop, I highly suggest you get one. With how thick the batter is, the scoop made it a lot easier to make sure each cup had close to the same amount. I don’t even want to imagine trying to use two spoons to do the same thing.
The coffee taste was a little strong for me, but then again, I’m not a huge coffee lover either. However, Jesse is and even he said that the granules needed to be grounded finely. Otherwise, the taste of coffee in the cakes were pretty good.
I did mess up one thing…I added the whipped cream to the cream cheese mixture and I totally wasn’t suppose to do that. Personally, I don’t think it changed the end result at all, in fact I liked it, but it did mean that there wasn’t the dual colors on top.
One other thing I didn’t do was use the coffee liqueur. I’m not sure if that changed the flavor a lot or not, but I didn’t miss it. Honestly, since neither of us really drink, I didn’t have any in the house and while there is a work around for it (down below), I simply forgot about it.
Also, the recipe says it makes 24 bite-sized cakes, but I ended up with 3 dozen using the small scoop. You know what, something else I just noticed is that in the Cook’s Tips, it only shows to use 1-2/3 cups of the cake mix from a 18.25oz package. That may be why my batter was so thick…I had a lot more than 9oz of cake mix. Mmmm….I didn’t even think to check the size of the cake mix box, I mean, it wouldn’t have dawned on me that there were various sizes.
 Ingredients:
1 (9oz) pkg of devil’s food cake mix
1/4 cup sour cream
1 egg
1 tbsp instant coffee granules
3 tbsp water
1/3 cup coffee liqueur
1-1/2 cups whipped topping
8oz mascarpone or cream cheese
1/4 cup powdered sugar
2 tsp vanilla extract
unsweetened cocoa powder
Directions:
- Preheat oven to 350 degrees. Spray cups of a mini-muffin pan with nonstick cooking spray. For cakes, combine cake mix, sour cream, egg, coffee granules and water in bowl; mix well. Place 1 tbsp of batter into each muffin cup. Bake 8 – 10 minutes or until wooden pick inserted in centers comes out clean.
- Meanwhile, place whipped topping into large resealable plastic bag; secure and set aside. For filling, combine cheese, sugar and vanilla in clean bowl; mix until smooth using clean scraper. Place filling into an additional resealable plastic bag; secure and set aside.
- Remove pan from oven to cooling rack. Press tops of cakes with lightly floured mini-tart shaper to make slight indentations; cool 2 minutes. Remove cakes from pan to cooling rack. Brush tops with coffee liqueur using a basting brush; cool completely.
- Trim corners of both bags. Pipe folling over cakes. Pipe whipped topping over filling. Sprinkle with cocoa powder, if desired.
Nutritional Values: 120 calories, 7g total fat, 4g saturated fat, 20mg cholesterol, 12g carbohydrate, 2g protein, 105mg sodium, 0g fiber
Cook’s Tips:
If desired, 1-2/3 cups of devil’s food cake mix from an 18.25oz package can be used for this recipe.
To substitute coffee liqueur, combine 1/4 cup water, 1/4 cup sugar, 1 tbsp instant coffee granules (finely grounded) and 1 tsp rum extract in microwavable bowl. Microwave, uncovered, on high 1-2 minutes or until sugar is dissolved; cool.
September 21, 2010
· jackie · No Comments
Posted in: Cakes & Pies
Strawberry-Coconut Tres Leches Trifle
Doesn’t this sound good already? I’m not usually a fan of “tres leches”, but when I received this from the Pampered Chef, there was something about it that made my taste buds water.
Now I will say this, while I wouldn’t call them exotic, there are definitely some ingredients that take some hunting for this trifle.
- Ladyfingers: I’ve never seen a ladyfinger before. I’ve never needed them, so I wasn’t exactly sure where to look in the store. After asking four different associates, walking up and down three different aisles and not finding anything that even remotely resembled what Jesse knew of ladyfingers, I ended up not using them. Instead, I was able to substitute pound cake for the ladyfingers and I think it works. I’m not sure what the taste difference would have been, so if anyone does try it with the ladyfingers, I would like to know.
- Coconut Milk: The idea isn’t new, it makes sense after all, but trying to find it – that’s something I haven’t done before. It is actually pretty easy to find, it’s right next to the condensed milk, but they don’t sell it like the condensed milk. Instead, you’ll be looking for a 32oz carton. Which means, since you only need 14oz, you’ll have some left over. Gives you a reason to make this again, doesn’t it?
Other than those two ingredients, everything is pretty easy to find. If you have the Korintje Cinnamon from the Pampered Chef, I would definitely recommend using that, but whatever kind of cinnamon you have on hand works just as well. Also, as you can tell by the picture, I didn’t pipe the cool whip on top. It may change up the presentation a little, but I find spreading it across the top works just as well. The one change I have made to the recipe is I doubled the strawberries. In the words of Jesse, it’s good for not being chocolate, but I felt like it needed more. The strawberry taste definitely works against the pudding mixture (in a good way) and I totally wanted more. So the original recipe calls for one pound, but personally, I would go with two.
Other than that, Jesse is taking this into work tomorrow, so we’ll see what his co-workers have to say.
 Ingredients:
2 lbs fresh strawberries, divided
3 pkg (3oz each) soft ladyfingers (about 24 total)
1 can (14oz) sweetened condensed milk, divided
1 can (14oz) unsweetened coconut milk, divided
1 container (8oz) sour cream
1 container (12oz) frozen whipped topping, thawed, divided
1 pkg (3.3oz) vanilla instant pudding and pie filling
1 tsp cinnamon
Directions:
- Set aside one strawberry for garnish. Hull and slice remaining strawberries. Cut ladyfingers into 1-in. pieces; set aside.
- Whisk together 1/2 cup of the condensed milk, 2/3 cup of the coconut milk and sour cream in large bowl. Add ladyfingers and toss gently.
- Reserve 1 cup of the whipped topping as a topping. Combine pudding mix and remaining coconut milk in a mixing bowl; whisk until thickened. Add remaining condensed milk and cinnamon; whisk until incorporated. Fold in remaining whipped topping.
- To assemble, place half of the ladyfinger mixture into Trifle Bowl; top with half of the strawberries. Spread half of the pudding mixture over strawberries. Repeat layers one time. Pipe whipped topping over top; garnish with strawberry fan.
Yield: 24 servings
Nutrients per serving: Calories 220, Total Fat 10g, Saturated Fat 8g, Cholesterol 10mg, Carbohydrate 29g, Protein 3g, Sodium 160mg, Fiber 1g.
Cook’s Tip: Ladyfingers are sheets of sponge cake that can be separated into long ovals and are found in the bakery section of most grocery stores.
One 16-oz (about 390-g) frozen pound cake, thawed, trimmed and diced into 1-in. (2.5-cm) cubes, can be substituted for the ladyfingers, if desired.
August 15, 2010
· jackie · No Comments
Posted in: Dessert
Peach Almond Pound Cake
Over the last year, I’ve discovered Tastefully Simple and have been trying a couple of thier products. Their Bayou Bourbon sauce is fantastic on meatballs and their Absolutely Almond Pound cake mix is one I could continuiously eat. However, after awhile, pound cake does begin to loose its appeal – if it’s only pound cake. So I started wondering what would happen if I threw some fruit into the batter. Most desserts that involve pound cake have you put the fruit on top, so why not inside, right? Seems like a logical experiment; one I have to say came out smashingly well.
More or less. I haven’t included a picture here mainly because the bread pan that I did use, it isn’t the same size as a normal bread pan and the cake doesn’t look that great. It’s definitely one of those delicious wrecks, but I’m going to attempt again before taking a picture of it. That is one thing you need to make sure you do – do not overfill the pan. I should have stuck with my initial gut feeling and split the batter between two pans, but I didn’t and I’m paying for it now.
I’m also thinking I have to cut back on the water because this came out really moist. Granted, that isn’t a bad thing if you’re not planning on slicing it like a bread; but I would like to see it hold together a little better, so I’m cutting the water from 3/4 cup to 1/2 cup. Remember, all of this is in regards to using peaches; I’m not sure if a different fruit wouldn’t have a varying result. I’m thinking raspberries would really even less liquid, but blueberries would be fine with what is below.
Ingredients:
1 box of Absolutely Almond Pound cake mix from Tastefully Simple
3/4 cups (or 1.5 sticks) of melted butter
1/2 cup water
1/4 cup peach juice
1 cup frozen sliced peaches, thawed and diced
Directions:
- Preheat oven to 325 degrees.
- Drain the peaches, reserving about 1/4 cup juice, and dice the peaches into smaller pieces (or any size you would like).
- Combine all ingredients (except peaches) in a large bowl; blend well. Do not over mix; batter will be lumpy. Fold in peaches.
- Spread batter in a greased 9×5 loaf pan.
- Bake for 50-55 minutes or until toothpick comes out clean. Cool completely; remove from pan and slice.
The only nutritional information I have is for the pound cake, which can be view here.

August 9, 2010
· jackie · No Comments
Posted in: Cakes & Pies
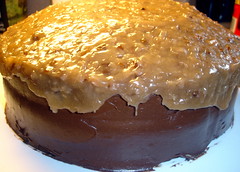
German Chocolate Cake
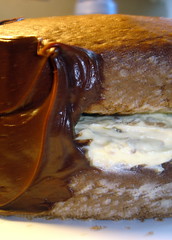 For my sister’s baby shower, Lori requested a German Chocolate Cake and I’ve been wanting to take a stab at one for awhile. Yes it’s easy to get the box mix and the fabulous chocolate pecan frosting, but yeah, I’m not one to settle for simple. I love layered cakes and I totally wanted to make a layered German Chocolate for her and I think I managed to do one that’s going to work out beautifully.
The base recipe is pretty much the same one I used for Ian’s first birthday cake (the Oreo Dark Chocolate), so there’s a few things to keep in mind:
- I know most cakes tend to be moist, but do NOT get the super moist cake mixes. They tend to be a little to pliable and will break apart when you try to manhandle them out of the pan and whatnot.
- Make sure you get the whipped frosting for the sides. Otherwise the frosting will end up pooled at the base and very thin at the top.
I am using two different frostings for this recipe. I don’t normally do that, but how can you have a German Chocolate cake without the Coconut Pecan frosting? You can’t, but that particular frosting doesn’t like to stick well, hence the reason for the second kind. Also, make sure you allow the cake to cool at least 2 hours, if not longer, before trying to level it off. If it’s not completely cooled, there’s a better possibility of cutting off more or making the cut uneven. As for the pudding mixture, the longer it sits, the better it is to work with. I usually make the filling the night before so it’s good and set. The whip cream will keep it creamy and still make it pretty firm, which is fabulous when trying to spread frosting on it.
Believe it or not, making these layered cakes is really easy. Since I started doing them 2 years ago, I’ve come to really rely on 10″ Cake Leveler and Cake Lifter. Seriously, trimming the top off the first layer is a lot easier with the leveler than using a wire. Plus,the lifter may seem frivolous, but it’s a lot sturdy than using my hands.
Added 7/23/10: One complaint I had was that the texture of the filling really didn’t go with the idea of German Chocolate. The pecans weren’t chopped enough and it was more creamy. So I added 7oz of coconut to the filling and I think this will do it.
 Ingredients:
1 pkg of German Chocolate cake mix + ingredients to make
1 pkg of whipped chocolate frosting
1 pkg of coconut pecan frosting
1 pkg of Jell-O Coconut Cream pudding mix
1 cup of cool whip
1-1/2 cups milk
7oz coconut
1/4 to 1/2 cup finely diced pecans
Directions:
- Combine milk and pudding mix in medium bowl. Beat with wire whisk 2 minutes or until well blended. Stir in 1 cup semi-thawed cool whip and pecans. Refrigerate at least 2 hours or until set.
- Prepare and bake cake according to box directions. Cool completely.
- Take one cake and level the top off, making it flat. Add the coconut to the chilled pudding mixture. Layer pudding mixture lavishly onto cake. Once completed, gently add the second cake on top of mousse.
- Use the whipped chocolate to frost sides of the cake. Use the coconut pecan to frost the top of the cake, letting it drip over the edge a little. Viola.
July 21, 2010
· jackie · No Comments
Posted in: Cakes & Pies
Strawberry Crisp
This is a recipe that stills needs a little work. The strawberries come out a little too mushy for me, but I totally think it can be done.
Ingredients:
4-6 cups quartered or sliced strawberries
2/3 cups quick cooking oats
1/2 cup sugar
1/2 cup bisquick
1/4 cup chocolate chips
1/4 cup butter or margarine
1 tsp cinnamon
Directions:
- Heat oven to 375 degrees. Mix together 1/4 cup sugar and strawberries. Spread strawberries mixture in ungreased square pan, 8x8x2 inches.
- Mix remaining ingredients until crumbly; sprinkle over strawberries.
- Bake 35 to 40 minutes or until strawberries are tender and topping is golden brown. Serve warm.
Variation: Substitute sliced peeled all-purpose fruit for strawberries; substitute nuts for any kind of chocolate or toffee chips; substitute blueberries (or other fruit) for strawberries.
Substitution for bisquick: 1/2 cup bisquick = 1/2 cup flour + 1 tsp baking powder + dash of salt
Ingredients for cake-size pan:
8 cups strawberries
1-1/2 cup quick cooking oats
1/4 cup brown sugar
1 cup bisquick
1/4 cup toffee bits
1/2 cup butter or margarine
1 tsp cinnamon
July 20, 2010
· jackie · No Comments
Posted in: Dessert


